How to Stop License Plate Rattle In Car?

Imagine if you’re enjoying a long drive with your friends and suddenly your car’s license plate starts to rattle. Which kept you wondering overall how to stop license plate rattle? This can be caused by a subwoofer or other speakers in the car. This article will show you how to fix the license plate rattle.

In this article, we’ll be discussing the benefits of the license plate, installing process of the license plate, and easy fixes of how to stop license plate rattle in the car? Let’s get started.

What Are The Benefits Of Using The License Plate?

Here are some benefits of using a license plate:

1. Avoid The Need For Screws In Between Alphabets/Numbers On The Plate:-

The screw locations on the car body/bumper will always be in the center of the plate. At times this will come on top of the number, spoiling the plate or ruining the aesthetics. With number plate frames, there will be no need for a screw to hold the number plate on the car body. The frame will be mounted on the car and the frame will ensure the plate stays on firmly.

2. Reduce Vibrations Of The Plate If The Car Has A Bass-Heavy Sound System:-

If you have a Subwoofer in the car, the number plate, especially the number plate mounted on the hatch door will resonate and make noise with music and this is annoying. The use of a number plate frame will prevent this.

3. It Will Give A Small Amount Of Protection For The Number Plate From Small Dents In The Event Of A Contact:-

As for the MVD mandated Safety Rivet, you can Rivet the plate on the top or bottom corners to comply with the norm without spoiling the aesthetics of the plate.

How To Install The License Plate In Car?

Firstly, Create a clean slate by removing your license plate and wiping it clean of any dirt or debris. This is also a great opportunity to wash and wax the area behind your plate.

Best License Plate Frames (Review & Buying Guide) in 2022 | The Drive

1. Protect Your Vehicle With Rubber Spacers:-

Peel the paper from the rubber spacers, revealing the adhesive. Align spacers with mounting holes and stick them to the back of the license plate to prevent vibration and protect the vehicle. If your vehicle only allows for 2-hole mounting, insert rubber plate bumpers into the lower holes.

2. Insert Plate Into Frame Using Tabs:-

Insert the bottom edge of the license plate into the frame so the mounting tabs hold the plate in place.

3. Prepare Hardware Hider Caps:-

Insert stainless steel screws through the hardware hider caps.

4. Put It All Together:-

Align license plate and frame with mounting holes on vehicle. Slowly thread each screw with hardware hider cap into the vehicle mounting hole in a clockwise direction.

5. Finishing Touches:-

Tighten screws until they are seated and firmed against the frame. Firmly snap all hardware hider caps closed. Remove any fingerprints from the license plate frame using a microfiber towel.

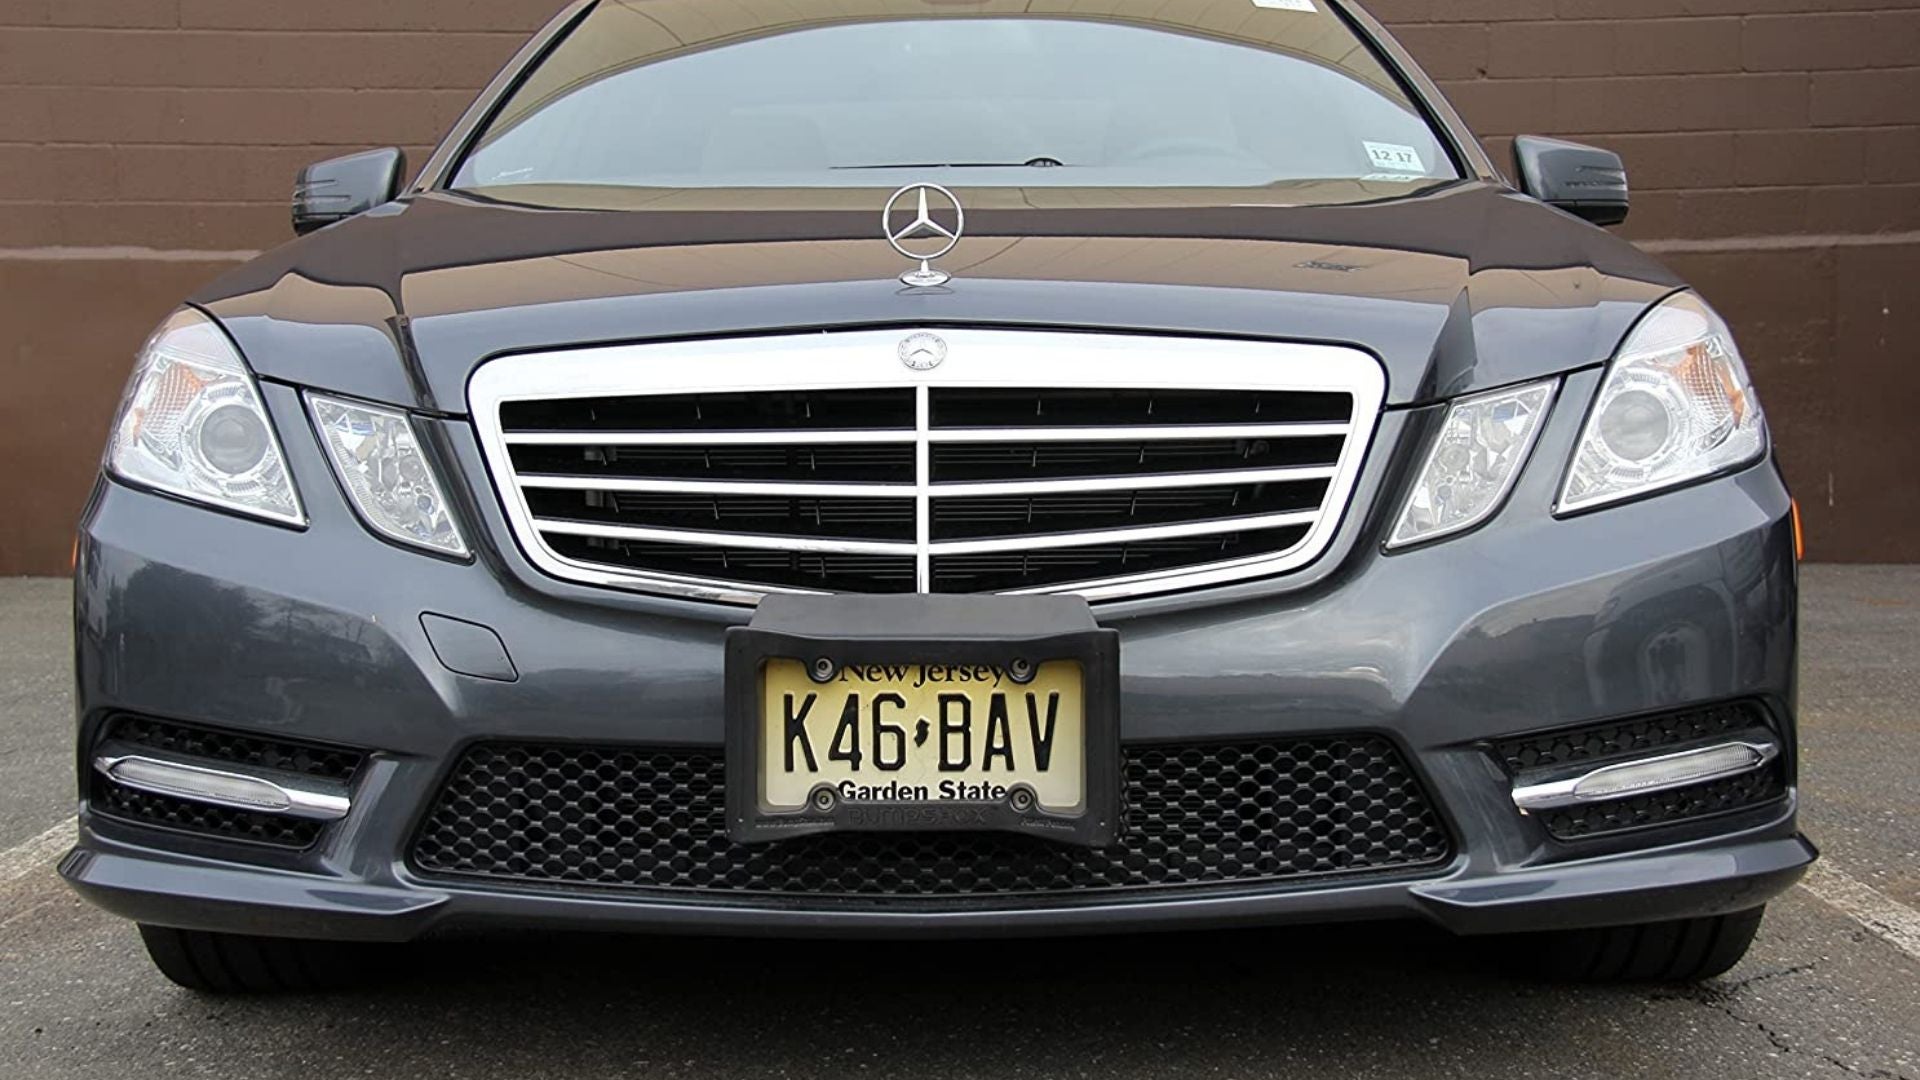
Here’s the installation process of the license plate in the car.

    How to Stop License Plate Rattle In Car?

    Here are some following steps through which you can stop the license plate rattle very easily:

    Step 1:- Identify The Noise

    The first step is to identify where the noise is coming from. Try turning on the radio and seeing if the noise changes. If it does, then the noise is likely coming from the speakers. If it doesn’t, it is likely coming from the license plate.

    Step 2:- Try Using Foam Padding

    To fix your license plate rattle is to put foam padding between the license plate and the car. This is a cheap and quick method of removing the rattle without much work.

    China Thick Tough Durable EVA Foam Rubber Car License Plate Frame Front Bumper - China Car Protective Bumper, License Plate Bumper | Made-in-China.com

    Step 3:- Adjust The Screws

    Try and adjust the screws on the license plate. This may fix the rattling noise.

    Step 4:- Attach A Piece Of Metal Or Plastic

    Another option is to attach a piece of metal or plastic to the back of the license plate. This will help to prevent the rattling noise.

    Best License Plate Frames (2022)

    Step 5:- Try Mounting The License Plate

    Finally, you can try mounting the license plate higher up on the car. This will help to keep it from vibrating against the car.

    Step 6:- Adjust Or Replace The Speakers

    If none of these methods work, you may need to adjust or replace your speakers.

    Hence, if you’re wondering how to stop license plate rattle then, these are some steps through which you can easily fix the license plate rattle. If you’ve followed all the steps properly but the issue remains it is recommended to stop your car at the auto care center.

    Conclusion:-

    We hope the above-mentioned information about the benefits of the license plate, installing process of the license plate, and easy fixes of how to stop license plate rattle in the car? will be helpful to all the readers.

    If anybody’s doubts persist feel free to comment in the comment section below. We’ll try to solve your doubts as soon as possible.

    Why Does My Ford Fusion AC Smells Like Gas?

    Even if the air conditioning in a car is one of the most popular functions when hot. It can as well lead to some inconveniences. In truth, if your ford fusion ac smells like gas, you should treat it as though you have a fuel leak until you for sure there isn’t one.

    Reasons Behind The Ford Fusion AC Smells Like Gas?

    The following are some possible reasons behind this cause:

    1.  Gas Cap:-

    The gas cap’s job is to keep the fuel vapor and fuel in the gas tank.  It has a seal that can go bad over time.  Once that happens, it’ll begin to let fuel vapor out and into the air.  Since it’s behind the driver, you really shouldn’t smell the smell of gas unless you are going down the road.

    2.  Fuel Vapor Exposure:-

    If you have just gassed up, you may have pulled somewhere where fuel was on the ground.  If this is the case, it can make its way up into your Fusion’s cabin.  When this happens, the problem slowly goes away and should not return.  If it doesn’t seem to dissipate, it’s time to move on to the next potential problem.

    3.  Fuel Pressure Regulator:-

    If the fuel pressure regulator has gone bad, it can let too much fuel into the fuel rails.  When this happens it’ll throw off the air/fuel mixture.  This causes your Fusion to have a gas smell coming from the exhaust pipes and a noticeable smell of gas.

    4. Dirty Air Filter:-

    The Air filter can also be the reason behind causing this issue. The air conditioning system in your Ford Fusion is probably leaking refrigerant gas. It will emit a noxious odor, which is not healthy. It will also spread throughout the passenger compartment.

    5. Dirty Evaporator:-

    Another common cause of the Ford Fusion AC smelling like gas is a dirty evaporator. Though the cabin air filter captures most of the airborne particles, a few fall to the evaporator. The dust particles will stick to the evaporator’s fins and block the airflow, which leads to poor cooling.

    6. Low Level Of Refrigerant:-

    The most common cause of this issue is a low level of refrigerant. This means that the refrigerant level is too low and the ac doesn’t work properly. Aside from this, it’s best to take the vehicle to a workshop where a mechanic can examine the faulty components. The odor in your Ford Fusion is most likely caused by a leak in the cooling system.

    Why Does The AC Of My Ford Fusion Have A Smell Of Humidity?

    The source of the bad smells originates from the air conditioning of your Ford Fusion. Regardless you have the feeling that it is a musty smell, humidity, or other. The source of these smells is generally similar.

    In truth, air conditioning makes a lot of humidity, which will usually tend to gather in the ventilation system of your Ford Fusion. This humidity is the ideal origin of the expansion of bacteria and fungi of all forms in the air conditioning of your Ford Fusion. Furthermore, it is possible that smoking in your automobile, or not cleaning it often (food remains for example) will develop amplify the odors.

    Finally, the last common explanation for a bad air conditioning smell in your Ford Fusion is that you have a refrigerant gas leak, called FREON gas. Which is toxic and emits a bad smell that will propagate in the passenger compartment of your car.

    How To Get Rid Of The Bad Smell Out Of My Ford Fusion?

    Now that you know where to look to uncover the cause of this smell, we will try to help you to get rid of bad air conditioning odors on your Ford Fusion because in addition to being uneasy these odors can be harmful to your airways, it is therefore essential to get rid of them quickly.

    Step1:-

    The air conditioning system in your Ford Fusion is probably leaking refrigerant gas. It will emit a noxious odor, which is not healthy. It will also spread throughout the passenger compartment. If the leak is not repaired in time, the ac system will no longer function properly. In order to fix the problem, you need to replace the dirty air filter and clean it regularly.

    Step 2:-

    The most common solution for this problem is to clean the cooling system. In order to do this, you must remove the front bumper. You can also use a power washer, which can clean the condenser but can damage its fins. If you can’t remove the front bumper, you can attempt to clean the evaporative emissions system using a pressure washer.

    Step 3:-

    Replace the cabin or pollen filter of your Ford Fusion: This filter which is designed to stop impurities from getting into the cabin of your car must be replaced every year and can store bad smells, remember to verify its condition.

    Step 4:-

    To fix this problem, you need to clean the air filter in your Ford Fusion. It’s very simple to do. You can use a power washer to rinse the filter and replace the air filter. If you don’t have a power washer, you can also clean the condenser with a sponge. Be sure to set the pressure to low, as high pressure may damage the fins.

    Step 5:-

    The dust particles will stick to the evaporator’s fins and block the airflow, which leads to poor cooling. Luckily, cleaning the evaporator is a relatively simple task, but it’s not as simple as you might think. You will need to remove the dashboard and the hood to access the evaporator.

    Therefore, these are some steps through which you can easily fix this issue of the ford fusion ac smells like gas.

    How To Preserve Your AC And Avoid Bad Smells In Your Ford Fusion?

    1. Switch off the air conditioning 5/10 minutes before turning off the engine: In truth, always performing this step will allow you to dry a maximum of humidity in your ventilation circuit and thus limit the humidity.

    2. Although it sounds basic, you don’t always have time to take care of your car, but garbage is the first thing that causes bad odors, so remember to keep your car healthy.

    3. To be certain that the air conditioning of your Ford Fusion is always in good functioning order (air conditioning compressor especially), it should be run for 10 minutes every month.

    4. Ensure that there is no leak in your air conditioning is important, indeed, the liquid is toxic, and additionally, the operation of your air conditioning would be downgraded in the case of a leak.

    Hence, these are some preserving tips to avoid the issue of the ford fusion ac smells like gas.

    Conclusion:-

    We hope the above-mentioned information about the issue of the ford fusion ac smells like gas will be helpful to all the readers. If anybody’s doubts persist feel free to comment in the comment section below. We’ll try to solve your doubts as soon as possible.

    Why My Left Car Speaker Not As Loud As Right Car Speaker?

    Many times one car speaker is louder than the other. The audio system of the car is upgraded by installing the speakers in the car. If you’re wondering why my left car speaker not as loud as the right car speaker? It’s because of problems in the amplifier, wire connection, weak battery, issues with an RCA cable, and poor quality of speakers.

    In this article, we’ll be discussing this problem in detail. Let’s get started.

    Reasons Behind Left Car Speaker Not As Loud As Right Car Speaker?

    Usually, two speakers are installed in their car to improve their car audio system. The speakers are connected to the amplifier or car stereo, but sometimes the car speakers do not work correctly.

    If you are facing this problem, then there will be several reasons behind it.

    1. Sparking Wires:-

    The wires often break or become loose, and the problem of sound in-car speakers. It also happens when one of the wires is coming in contact with the body of the car. The wires can also burn due to the overheating, and the speaker stops to produce a loud sound. 

    2. Weak Car Battery:-

    The weak car battery harms the speakers of the car. Two speakers in a car get more power from the battery. Due to this, the car battery may drain or die. The terminals of the battery often get corroded, and due to this, the one or both car speakers produce low sound. You may get irritated when you hear a loud sound from one speaker and a low sound from the other speaker. 

    3. Reversed Polarity Problem:-

    The reversed polarity can cause the production of low sound from car speakers. You may insert the wires of the speakers in reserved polarity. The reverse polarity does not have a positive effect on the car speakers.

    Due to reversed polarity, the car speaker produces a loud sound as compared to the other car speaker. There are very few speakers that have the same polarity, while most car speakers do not have the same polarity. Therefore, your car speakers may have different polarities, and you have mistakenly reversed the polarity of the car speakers.

    4. Loose Connection:-

    The car speakers are connected to the amplifier or car stereo through wires. The connection between the amplifier and car speaker often becomes loose and disturbs sound quality. The nuts through which the wires are connected may be loose and cause this problem. 

    5. Amplifier Issue:-

    If the edges of the amplifier touch the metal part of the car, then it can cause a problem sound in the speaker of the car. It is suggested that check the edges of the amplifier, and if these are touching the metal, then cover the edges with the electrical tape. 

    6. Issue In The RCA Cable:-

    The issue in RCA cable can cause the production of loud sound in one speaker as compared to the other. If the pin of the RCA cable breaks, then this can cause this problem. It is used to connect the car speaker with the amplifier, and it also affects the sound quality of the speakers.

    7. Space Problem:-

    If the space for the speakers is not sufficient, then the speakers do not produce sound appropriately. The extra space is mandatory for car speakers. If enough space is not provided for the car speakers, then the speakers do not work properly. There should be enough space for the car speakers so that speakers easily fit in the car. There are numerous shapes of the car speakers; consequently, select the speakers according to space in the car.

    8. Low-Quality Car Speaker:-

    The performance of car speakers reduces due to their low quality. You may buy cheap car speakers to save your money, and now you are facing a sound problem with the speaker of your car. The components of the cheap car speakers are of low quality and wear out soon.

    Here are some basic common reasons behind your left car speaker not as loud as the right car speaker issue.

    Here’s How To Fix The Issue Of The Car’s Speakers?

    You’ll need to follow the following steps to cure this problem with your car’s speakers:

    Step 1:-

    It is suggested that you should check the wires of your car speaker if the wires are broken or loose then replace them with the new ones. 

    Step 2:-

    It is advised that you should check the battery of your car if you face the problem of sound in one speaker. If your car battery looks weak, then you should replace it with the new one. If the terminals of the car battery are corroded, then clean your battery.

    There is a simple method of removing the corrosion from the battery. First, turn the engine of your car OFF and clean it with a piece of cloth. Then, apply baking soda to the terminals of the battery and leave it for a few minutes. After a few minutes, clean the terminals with a clean cloth.

    Step 3:-

    The wires of the speakers are both positive and negative, and the wires should be in the right place. It is recommended that check the polarity of your car speakers with the help of a multimeter to get rid of this problem. If you see a problem in the polarity of wires, then do correct them.

    Step 4:-

    It is proposed that you should check the car speaker to get rid of this problem. The dust in the car speakers can cause a sound problem. Therefore, open the car speaker and remove the dust from the edges and central area with the help of a soft piece of cloth.

    Step 5:-

    It is suggested that if you have connected your car speaker with the amplifier, then you should check the connection of wires. If you see a loose connection between the car speaker and amplifier, then you should maintain the connection. If the nuts are loose, then you should tighten them. The car speaker often produces low sound than the other when the wire of one speaker is crushed.

    Step 6:-

    The fuse of the car speakers can cause this problem. When the fuse of car speakers wears out, then the sound quality of the car speaker decreases. It is proposed that replace the fuse with the new one because the fuse is not expensive and you will easily purchase it.

    How to tap into a car fuse box for accessory or amp turn-on power in 2022 | Car  audio systems, Car stereo installation, Car amplifier

    Step 7:-

    If the space problem is causing this issue of left car speaker not as loud as the right one. It is advised that you should select the sizes of the car speakers according to space in the car. Measure the overall diameter of the car speaker and then check the space in your car. The space for the car speakers should be equal to or greater than the car speakers.

    There should be enough space for the car speakers so that speakers easily fit in the car. There are numerous shapes of the car speakers; consequently, select the speakers according to space in the car.

    Step 8:-

    The signal between the speaker and other devices was lost due to the broken RCA cable. It is suggested that check the RCA cable, and if the RC cable looks broken, then you should fix it.

    Here are some steps through which you can easily solve this issue at home itself. And if you’re unable to do so then, it is suggested to take your vehicle to the best auto care center possible.

    How to Choose the Best New Car Speakers

    Conclusion:-

    We hope the above-mentioned information about the left car speaker not as loud as the right car speaker will be helpful to all the readers. If anybody’s doubts persist feel free to comment in the comment section below. We’ll try to solve your doubts as soon as possible.

    What Does The Engine Fail Safe Mode Mean?

    When a system failure happens and the engine fail safe mode is activated by the computer. Some of the vehicle’s features will become limited, and the speed of the car will be reduced. This is an attempt by the computer to reduce the risk the failure poses to your car. By limiting how far and fast you can drive.

    What Does It Mean When It Says Engine Failsafe Mode?

    The objective of the Fail safe mode in your car is to prevent or minimize damage by altering engine load characteristics or transmission shift. The term “safe mode” describes how we as humans protect our computers against harm. An automatic system safety mode offers the safety of the vehicle as a precaution against system failures. A computer should act as a failsafe device when a system failure results in some of the vehicle’s features becoming limited and its speed decreased when this occurs.

    What Happens When The Engine Fail Safe Mode is Activated?

    Once this failsafe or limp mode has been activated, the ECU will limit the vehicle’s ability to drive normally. In some instances, the ECU will permit you to limp home or to a mechanic. Which will restrict the performance or speed of the vehicle due to that the damage won’t get worse. This is where the term “Limp Mode” comes into play, by allowing the car to slowly get to a destination for diagnosis and repair. You may also notice it accompanied by the Check Engine Light turning on.

    There are some instances that will cause the failsafe mode to disable the vehicle’s ignition or fuel system. This will cause the engine to “fail” to start. This can be a blessing, especially if there is minor mechanical damage that can progressively get worse if the engine continues to run.

    What Causes The Engine Failsafe Mode?

    While limp mode can be caused by many different problems, there are a few common causes that can be easily identified.

    1. Low Fluid Level:-

    Low fluids, especially transmission fluid and oil, can cause a vehicle to enter limp mode. This is especially true of the transmission fluid since low fluid can cause low pressure, which will not allow the transmission to operate properly.

    causes of limp mode

    2. Sensor Malfunction:-

    There are quite a few sensors that control the engine and transmission. If one of the sensors, such as the MAF, MAP, TPS, or speed sensors are sending improper signals to the computer, the limp mode can activate.

    bad map sensor symptoms

    3. Damaged Wiring:-

    Damaged or broken wiring can also be a potential cause. Wires can be damaged by heat, debris hitting them, or even battery acid leaking onto them. Damaged or broken wiring can also be a potential cause. Wires can be damaged by heat, debris hitting them, or even battery acid leaking onto them.

    damaged wiring

    4. Failing Clutch Or Transmission:-

    A failing or failed clutch can also cause a vehicle to enter limp mode. Improperly adjusted linkage and bad solenoids in the transmission will activate limp home mode in order to prevent further damage to the transmission.

    How Is The Engine Failsafe Mode Diagnosed?

    Since this safety system is activated through the ECU or powertrain control module (PCM), with transmission-related issues. A professional mechanic will start by downloading the error codes stored in these computers to begin the diagnosis process.

    Sometimes the engine fail safe mode is triggered due to a sensor failure or an electrical glitch. It’s also common for a security system fault to engage this warning light, which means it’s not always a mechanical issue that’s causing the failsafe.

    Some people believe it’s possible to reset the engine failsafe mode through some less-than-reliable methods. This is not true, nor is it effective at resolving the problem. A professional mechanic is need to be contacted to complete an onsite inspection to correctly diagnose the root source of the engine failsafe mode. This will permit them to recommend the right repairs or reset the error if it was a minor glitch.

    What Happens When A Car Goes Into Failsafe Mode?

    When the automobile is engaged in the failsafe mode, safety is reduced. An auto repair shop might be able to locate your vehicle in case it malfunctions while you are on the road or if you don’t have a technician nearby. In failsafe mode makes sure the faulty part does not further damage the car.

    What Are The Symptoms Of Limp Mode?

    The symptoms will vary. Again, this has something to do with the make and model of your vehicle. But the general symptoms are hard to ignore:

    1. Limited Speed And RPM:-

    When active, your car may exhibit a variety of symptoms. Limp mode limits the amount of power to your engine and transmission. RPMs may be limited (usually to less than 3,000), and your driving speed will often be limited to about 35 to 45 MPH, making it impossible to drive at highway speeds and you may find yourself unable to shift above 3rd gear.

    2. Poor Performance:-

    Acceleration will be sluggish and you may feel your engine shuddering or misfiring. You may find that your transmission automatically downshifts and you’re unable to shift above 3rd gear or maybe even not be able to shift gears at all.

    tire noise

    3. Check Engine Light:-

    The check engine light will illuminate or flash, and depending on the failure, you may notice your vehicle overheating. If overheating occurs, you must immediately pull over off the road and give your car time to cool down to prevent further damage to the engine and transmission before attempting to drive any further.

    Can You Drive In Failsafe Mode?

    Yes! It’s for that very reason that cars need failsafe mode. This means the vehicle and the car will slowly limp their way around the home or to a mechanic as instructed.

    What Happens When A Car Goes Into Safe Mode?

    The point is clear. It takes a catastrophic risk to damage your transmission when it’s in safe mode. When your car is in safe mode, it may make you believe the transmission has failed.

    How Do I Turn Off The Failsafe Or Limp Mode?

    If the engine fail safe mode occurs, the first thing to do is find a safe spot to pull over at. Once pulled over, there are a few things you can do to try and reset your vehicle’s computer.

    1. Check And Top Off Fluids:-

    The first thing is to check your fluids. To do this you will need to be on level ground. With the vehicle in park, and the engine running, first, check your transmission fluid. If it is low, this is most likely your culprit. Adjust the fluid to with proper specifications, and take note of the color and smell. Dirty or burnt transmission fluid can cause issues as well. Once the fluid is topped off, shut off the engine and reset the car’s ECU.

    check engine oil

    2. Shut Off Engine And Restart:-

    The next fix you can try is to shut off the engine and let it rest for at least 5 minutes. During this time you can check the engine oil level, as well as the level of all the other fluids under the hood. Sometimes, this brief rest will allow the computer to reset itself and bring it out of failsafe or limp mode.

    3. Clear Check Engine Light:-

    A third option is to disconnect the battery cables. It is best to pull both cables off the battery and hold them together for 15 to 30 seconds. This will drain any residual power from the computer and cause it to forget any codes that may be stored. Clearing the codes with an OBD2 scanner will achieve the same results and is faster and safer.

    bypass limp mode

    Conclusion:-

    We hope the above-mentioned information about the engine failsafe mode will be helpful to all the readers. If anybody’s doubts persist feel free to comment in the comment section below. We’ll try to solve your doubts as soon as possible.

    My Car Won’t Start But Makes Fan Noise, What To Do?

    It’s 8:00 AM. You load up your car. You turn the key in the ignition and find that even though you’re ready to take on the day, your car won’t start but makes fan noise. Why?

    We’ll explain the common culprits behind an engine that won’t start but makes fan kinda noises, and how you might be able to fix the issue temporarily.

    Does Your Car Crank But Won't Start

    Here Are Some Common Culprits Behind Your Car Won’t Start But Makes Fan Noise?

    Here are the common culprits which might be the reasons behind your engine making noise even when it is shut.

    1. Broken Battery Or Alternator:-

    If you try to jump-start the car and do so successfully but it then shuts off, the problem may be with the alternator. A broken alternator could also lead to a broken battery. It is therefore important to pinpoint the fault, which you can do by testing the alternator.

    2. Faulty Starter:-

    Your car’s failure to start could also be caused by a faulty starter motor. In most cases, a bad starter will not produce a continuous rapid click. Instead, you will probably hear a single loud click. It is also possible that you will hear a grinding noise or you may only hear a whirling sound.

    3. Dead Battery:-

    Perhaps the most common problem that causes a clicking or fan kinda noise when trying to start a car is a dead battery. The normal voltage of a car battery should be 12.6 volts or above. If the test shows that it is lower, the battery is a likely culprit.

    man using jumper cables to start car

    4. Bad Wiring:-

    As with all electrical components, a bad wire somewhere in the electrical system could negatively impact the rest of the system. You should be extra careful to ensure that the clamps are connected to the battery. There is also the possibility that corrosion is affecting the battery terminals, making it impossible for any current to pass through the cables.

    mechanic changing car battery

    Here are some possible common culprits which are causing the issue of the car won’t start but makes fan noise.

    Here Is What To Do If You Face This Issue?

    If you want to cure the problem you’ll need to follow the below steps properly:

    My Car Is Making a Whirring Sound in the Engine

    Step 1:-

    Firstly, you need to test the battery to see if it is dead or not. To test the battery, you can simply use a voltmeter (or multimeter) to measure the voltage in the battery.

    Step 2:-

    Secondly, you’ll need to test the car’s alternator. If you try to jump-start the car and do so successfully but it then shuts off, the problem may be with the alternator.

    Step 3:-

    Thirdly, check the wiring of the car as the corrosion can affect the battery terminals. If this is the case, disconnect the battery and try to get rid of the corrosion with a battery cleaning agent. Always ensure you follow all precautionary methods when working with a battery or electrical components in general.

    Hence, these are some steps through which you can resolve the issue of the car won’t start but makes fan noise. If you’ve followed all the steps but are unable to solve the issue then it is recommended to better stop your car at one of your trusted mechanics.

    Conclusion:-

    We hope the above-mentioned information about the issue of the car won’t start but makes fan noise will be helpful to all the readers. If anybody’s doubts persist feel free to comment in the comment section below. We’ll definitely try to solve your doubts as soon as possible.

    Why Does Car’s Transmission Slips When Cold Outside?

    Everyone loves cold weather but it can turn out into a nightmare for you as and when your car’s transmission slips when cold outside. The wintertime can create chaos for your car’s transmission system. The cold weather can cause your transmission system to have a low line pressure by freezing and leaking fluid from the transmission seals.

    When a transmission has a low line pressure it can mean multiple things such as inadequate fluid within the system, slipping transmission, and improper function of gears.

    Reasons Why Does Car’s Transmission Slips When Cold Outside?

    Here are some primary reasons for the transmission slipping issue in cold weather:

    1. Low And Dirty Fluid:-

    When the fluid in your transmission is low or dirty, it can cause the gears to slip and grind against each other. This is especially common in cold weather when the fluid is thicker and harder to flow through the system.

    To fix this problem, you’ll need to have your transmission flushed and refilled with fresh, clean fluid. You may also need to replace the filter.

    2. Damaged Transmission:-

    When your transmission is damaged, it can cause the gears to slip and grind against each other. This can be caused by a variety of things, including wear and tear, a bad seal, or an accident. To fix this problem, you’ll need to have your transmission repaired or replaced.

    3. Faulty Component:-

    If there is a faulty component in your transmission, it can cause the gears to slip and grind against each other. This could be due to a variety of things, including a damaged solenoid or a broken gear. To fix this problem, you’ll need to have the component repaired or replaced.

    How Can I Tell If My Car’s Transmission Is Slipping?

    For some people, their transmission works fine unless it is cold. We will talk about the signs of a slipping transmission. Knowing the signs of a slipping transmission is important because if you catch the problem early enough, then you can fix it before major damage occurs.

    Sign 1:-

    The first sign of a slipping transmission is hesitation when you put it into gear. When you put the car from the park or neutral into drive or reverse it takes longer than a second. This delay is a sign that there is an issue with the transmission.

    Sign 2:-

    The next this is if there is a clunk or jolt when changing gears. This means there is an issue with the gearbox that needs to be looked at right away. This is also the case if you notice hard shifting while driving and the car is switching gears.

    Sign 3:-

    The next sign is the high RPM of the engine before the car shifts. If your vehicle gets much above 3500 RPM before shifting, then that is a sign of concern, especially if it happens regularly. This lack of shifting quickly enough can also cause delays with your acceleration. This is a bigger issue than you might think because it can put you in harm’s way while driving.

    Also, high RPMs may occur when the car downshifts if you have transmission issues because it might downshift sooner than it should.

    Sign 4:-

    Lastly, if you notice any odd smells while driving such as burning oil and it is accompanied by the hard shifting, clunks, grinding, or more noise driving, then this is a major indication that the transmission has an issue.

    Is It Normal For A Transmission To Slip When Cold?

    No, it’s not normal for your car’s transmission to slip when it’s cold. If this is happening to your vehicle, it’s important to take it to a mechanic so they can diagnose the problem and fix it.

    Can I Drive My Car If The Transmission Is Slipping?

    No, you should not drive your car if the transmission is slipping. This can cause further damage to the transmission and may even lead to a complete breakdown.

    How Much Would It Cost To Fix A Slipping Transmission?

    Car Won’t Move In Any Gear Automatic Transmission

    The cost to fix a slipping transmission will vary depending on the severity of the problem. In some cases, you may be able to have the transmission flushed and replaced with new fluid for around $200.

    But, if the damage is severe, you may need to have the transmission rebuilt or replaced, which can cost upwards of $2000.

    How Can I Fix My Car’s Transmission Slipping Problem?

    In case your car’s transmission slips when cold outside, there are a few different ways to fix the problem. One option is to have the transmission flushed and replaced with new fluid. This will get rid of any dirt or debris that may be causing the gears to slip.

    The other option is to have the transmission rebuilt or replaced entirely. This is usually only necessary if the transmission is severely damaged.

    How Can I Prevent My Car’s Transmission From Slipping?

    There are a few things you can do to prevent your car’s transmission from slipping.

    First, make sure to check the fluid level regularly and top it off if necessary. Second, have the transmission flushed and replaced with new fluid every few years. This will help to keep the gears clean and lubricated.

    Finally, be sure to take your car to a mechanic regularly for maintenance and repairs. By following these simple tips, you can help to keep your car’s transmission in good working condition and prevent it from slipping.

    Conclusion:-

    When your car’s transmission is slipping, it’s important to take it to a mechanic right away, as fixing the transmission issues at home is rarely a good idea. They will be able to diagnose the problem and recommend the best course of action to fix it.

    We hope the above-mentioned information about why does the car’s transmission slips when cold outside will be helpful to all the readers. If anybody’s doubts persist feel free to comment in the comment section below. We’ll definitely try to solve your doubts as soon as possible.

    How To Disable ABS Light On Silverado?

    If you are wondering how to disable abs light on silverado, you have come to the right place. Here, we will show you how to disable ABS light in less than 5 steps. Let’s get started.

    Chevy Silverado ABS Light On Causes?

    Here, look at the causes and why it’s important to know how to disable abs light on silverado.

    1. Wheel Speed Sensors Are Broken:-

    The purpose of the wheel speed sensor is to tell your car how fast the wheels are turning. When the speed gets unusually high, it sends a signal to the system. Once the system receives the signal, it alarms you with an ABS light. However, if the wheel speed sensor is broken or dirty, it will show faulty results. This is because the sensor will send signals of fast speed even when the wheel is turning at an average pace.

    Due to a faulty wheel sensor, you may not know when your car is moving too fast. This can very likely lead to accidents. When you see your wheel sensor is giving wrong signals, you need to disable ABS lights and fix the issue.

    2. Hydraulic Circuits Are Damaged:-

    Hydraulic circuits enable a car to stop. However, damaged hydraulic circuits fail to do so. When this happens, your car’s ABS realizes that your vehicle is in a vulnerable state. Once it gets the signal, your Silverado’s ABS will show you signs.

    The Silverado’s ABS light can mean that your car’s hydraulic circuits are damaged. Therefore, you need to disable it first to fix the issue properly.

    3. Malfunctioning ABS System:-

    Your Silverado’s ABS is connected with other systems of your vehicle as well. The ABS receives the signal from sensors connected with different parts of the car. The ABS light goes on if one or more of these parts sends irregular signals.

    This type of malfunctioning can prevent the generation of a signal when it is needed. If you want to solve this issue, you need to disable the ABS light and fix the ABS overall.

    4. ABS Module:-

    The antilock brake system runs through the ABS module. This module physically controls the anti-lock brake system  If it becomes damaged, and can no longer control all four brakes, the ABS light will activate. Typically, corrosion is the most common reason why the module fails.

    5. ABS Fluid Level:-

    If the fluid level is too low to keep pressure in the ABS lines, the ABS light will come on. Without the pressure, the ABS will no longer be able to physically activate.

    Therefore, these are some basic causes that trigger the ABS light to come on.

    Is It Safe To Drive Your Silverado?

    The ABS light is different than the brake warning light itself. The brake light indicates that there is a problem with the physical braking system and that your Silverado is unsafe to drive.

    Yes, you can drive your Silverado with the ABS light on. Is it safe? It’s not as safe, especially when it’s raining, snowing, or the road surface is loose/uneven. That’s why we recommend having the ABS fixed as soon as possible.

    How To Disable ABS Light On Silverado?

    If you have ABS light on your Silverado, it can mean a lot of things. However, if you need to disable the ABS light on your Silverado, then keep on reading. Here are the easiest method of disabling ABS light on Silverado with 3 simple methods.

    Step 1: Manage Power Supply:-

    To get into the disabling process, you will have to cut off and manage the power supply first. Here’s how to do it:

    1. Detach the positive cable from the car battery.

    2. Hold down the brake pedal and wait till the vehicle’s electrical system drains properly.

    3. Check if this has reset the car’s central computer.

    4. Now plug the cable back in.

    5. If this doesn’t reset your car’s system and reset the light, then repeat the whole process.

    Step 2: Working With The Sensors:-

    Now you will have to change the ABS sensors. Here’s what you need to do:

    1. Unscrew the housing of the sensor located on the wheel hub.

    2. Unplug all the wirings.

    3. Place and screw a new sensor.

    4. Reset the whole system of your Silverado.

    Step 3: Using OBD Code Reader:-

    Your final resort now is to use an OBD code reader. OBD code reader is a device that identifies and displays the different issues with cars through codes.

    To do that, you will have to connect the OBD device to your car. Here’s how to do it:

    1. Locate the DLC or the diagnostic link connector under the dash near the steering column. If you are having difficulty locating the port, then take the help of your car’s manual.

    2. Open the lid hiding the DLC system and insert the code reader’s connector.

    3. Now power on the OBD code reader and see the codes displayed on the screen.

    You can find the problem with your car with the codes. Here code chart that can help you determine the issue. Once you have identified the problem, just fix it, and your ABS light will be off. Here’s the simplest method of how to disable abs light on silverado.

    FAQs:-

    1. What happens if I remove the ABS fuse?

    If you remove the ABS fuse, the car will not have any problem operating normally. However, the ABS will be off and will not turn on till you put the fuse back in.

    In the worst-case scenario, removing the ABS fuse can lock the wheels as well. So be aware of that.

    2. Can ABS be turned off?

    In most cars, including Silverado, the ABS cannot be turned off using the car’s operating system. However, you can do this manually with every model available.

    3. Can I drive without an ABS fuse?

    Yes, you can drive without an ABS fuse. But this possesses the chance of brake failure and even locked wheels.

    4. Does a blown fuse cause ABS light to come on?

    A blown fuse can be a reason why the ABS light comes on. When a fuse blows, the car’s system considers this a signal that the engine or the brake system is damaged. As a result, the ABS light comes on.

    Conclusion:-

    We hope the above mentioned information about how to disable abs light on silverado will be helpful to all the readers. If anybody’s doubts persist feel free to comment in the comment section below. We’ll try to solve your doubts as soon as possible.

    Why Does The Same Headlight Keep Burning Out?

    What if you’re driving home late one night and you notice that one of your headlights is burned out. Which will keep you anxious by thinking overall, “why does the same headlight keep burning out?

    This is obviously a concern, driving at night or in inclement weather with just one headlight is dangerous. Learn how to deal with this problem in this article.

    Causes: Why Does The Same Headlight Keep Burning Out?

    The primary reason your headlights keep burning out really comes down to either you are touching the bulbs when you are installing them into your assembly, or there is quite possibly a bad wiring connection somewhere along the line of your headlights. Read on to learn some causes of premature headlight bulb burnout.

    1. Loose Wiring Connection:-

    Because of loose wiring, the flow of electricity to the contact point with the bulb will not be quite right, and will actually cut off, and back on at fast intervals. The constant on and off will cause the bulb to get heated up. These fluctuations in the electricity flow cause the filament inside the bulb to go bad, and break, causing your headlights to no longer work.

    2. Touching Bulb While Installing:-

    However, traces of dirt or grime and moisture from your skin while fitting a new bulb might cause uneven heating around its surface. As such, there is a structural failure in the bulbs and they might get explode.

    3. Excessive Vibration:-

    Vibration caused by driving over rough roads, potholes, and bumps will reduce the filament lifespan. The halogen filaments inside the bulbs can’t withstand excessive vibration. Another cause of vibration may be a fault in your headlight structure. If the bulb is not securely mounted in the headlight assembly, it will vibrate, even under normal driving conditions. Insecure mounting may be the result of a bent bulb socket or headlight housing.

    Similarly, if the headlight housing is not securely attached to your car, the entire housing, including the bulb and filament, will vibrate while you are driving, shortening the filament lifespan.

    4. Condensation Inside The Headlights:-

    Because of excessive condensation inside the headlights, there could be electrical shorts. As such, it reduces the lifespan of the bulbs and so you should check if there is too much dampness inside the housing.

    5. Faulty Voltage Regulator:-

    A voltage regulator is an important piece of electrical device for a vehicle. In short, it limits the maximum amount of voltage that flows through the whole wiring system. That way, it provides a safe and usable amount of electricity for the components to use. Therefore, if you are having issues with your voltage regulator, chances are that it might impact your headlight bulbs. That’s because the flow of electricity won’t be constant and it might blow the bulb’s filament.

    Therefore, these are some basic causes for your question “why does the same headlight keep burning out?

    How To Deal With The Same Headlight Burning Out Issue?

    To solve this issue of headlight getting burnt out you should try the following below-mentioned steps:

    Step 1:-

    Sometimes, vibration caused by the vehicle can loosen the headlight. So, it is wise to check all the bolts connecting to the headlight are tight and no mounting is cracked around the headlights. Also, check whether the electrical connectors that hold the bulb are secure. Or else It is a good idea to fit new connectors to the bulb so that you can eliminate these kinds of issues.

    Step 2:-

    There is no question that halogen bulbs become very hot. So, when you feel the need to replace and touch them with your hands, they become very dirty. Bulbs need an evenly heated surface so that they can last for a longer time. The best practice is to use latex gloves and try to touch the metal (or plastic) base while installing them. However, this can be tricky because of the limited amount of space.

    Step 3:-

    Cheaper bulbs are nowhere near the standard high-end bulbs. The filaments on the bulb are made from a very thin tungsten gauge, which might fail in no time if the quality is not good. Vibrations are the common causes that make these cheaper bulbs fail. If household technologies are put into the car bulb, there will be failures. Therefore, look out for a high-quality brand that specializes in car bulbs.

    Step 4:-

    If the excessive vibration is causing the problem then, Therefore, check the retaining springs that hold the bulb and double-check whether they are tight and secured.

    Hence, these are some basic steps through which you can avoid such incidents which kept you wondering, “why does the same headlight keep burning out?

    FAQs:-

    1. How long should headlights last?

    Most halogen headlights will generally last you a couple of years without issue! However, this of course is determined by how much you keep those headlights on. That said, LED headlights realistically will last as long as the car, and probably past that, as they don’t have filaments like halogen bulbs.

    2. Will Autozone change my headlight?

    Autozone is actually one of the great stores where you can stop by, buy a bulb, and get a bit of help installing them! That said, if you have a vehicle where it requires quite a bit of work to install bulbs (looking at you Gen 1 Audit TT), you likely won’t be able to get much help, and will have to find a qualified mechanic.

    3. Should I replace both headlight bulbs at the same time?

    Replacing both bulbs at the same time is not really necessary, and you can do one at a time. However, you generally should change both, if you are changing types of bulbs, as the colors will be slightly different.

    Conclusion:-

    We hope the above-mentioned information which kept you wondering, “why does the same headlight keep burning out?” will be helpful to all the readers. If anybody’s doubts persist feel free to comment in the comment section below. We’ll definitely try to solve your doubts as soon as possible.

    What Does The Service Stop/Start System Warning Light Mean In Car?

    When any notification appears on your car’s dash, it can cause a fair amount of stress. Especially if you don’t know how serious the alert may be. What if the service stop/start system warning light system flashes on the dashboard? Nothing can be more frustrating than that.

    What Does The Service Stop/Start System Warning Light Mean?

    Many modern vehicles are equipped with automatic start-stop systems that are designed to save fuel in stop-and-go city driving. These systems can shut the engine off when the vehicle is slowing to a stop and quickly turn the engine back on once the brake pedal is released. This reduces the amount of time the engine is idling when sitting in traffic.

    The engine start-stop light is typically an “A” surrounded by a circular arrow, and it can indicate a few different things. It may illuminate in a green or blue color to show that the system is active, or in an amber color to show that the system has been disabled. An exclamation point next to this icon usually indicates a fault with the start-stop system.

    How Does Automatic Start-Stop Systems Works In Car?

    In recent models, the engine even switches off if the speed falls below a certain value. The primary source of power for all systems is switched off. The power continues to supply to all of the electrical consumers and assistants. This is provided by the battery of the vehicle. The automatic start-stop system restarts the engine as soon as the clutch is actuated. For vehicles with automatic or dual-clutch transmissions, the automatic start-stop system responds to the actuation of the brake alone. The automatic start-stop system stops the engine. The automatic system restarts the engine again by releasing the brakes.

    What Are The Causes Of Auto Start Warning Light Malfunction?

    If your car’s engine light comes on, the first thing you need to do is check the owner’s manual for a list of possible malfunctions. The owner’s manual will provide specific instructions as to what to do in order to identify the cause of the problem.

    Malfunctioning Auto Start Warning Light. The most common causes for a malfunctioning Auto Start Warning Light are:

    1. Underhood fuses and circuit breakers

    2. Engine coolant temperature sensor

    3. Fuel injector

    4. Ignition coil

    If you can’t find a solution from there, then it is best to take your car to an auto repair shop for professional help.

    Can I Drive With An Auto Start-Stop Warning Light?

    It is very important to know the safety as well as the danger that can be involved in driving when the auto start-stop warning light is on. It is equally good to avoid the danger by making use of the precautionary measures. So if you notice such a warning light signal, then you need to stop over and cross for any issue.

    Signs Of Auto Start-Stop Warning Light Sensor?

    Actually, from the above, the light is in form of an exclamation point which always shows the indication of a problem with the system. While the image shows the symbol of A located inside the vehicle and the outside symbol showing exclamation points.

    In this case, if the light stays illuminated after the starting of the vehicle, it indicates that there is a failure of the power steering system. Also, the car may not be switched off and the solution is to remove the ignition key for a few seconds.

    Also, you should try the process again by switching off the engine of the motor vehicle after some tomes. If the light doesn’t go out of the system as expected, care must be taken as assistance is actually needed.

    How Much Does It Cost To Fix This Warning Light Issue?

    The service stop/start system warning light depicts if there is a problem or shows the system is off or on. There is a circle-shaped arrow which is a standard icon that indicates the start or stop of the system.

    Some garages of the vehicle may actually block the process that is called forced regeneration. This usually costs around the worth of $125 but even though it is not a hundred percent guaranteed in fixing.

    Auto Start-Stop Warning Light Quick Fix?

    The service stop/start system warning light and its system are not as potent in damaging as cold start but pose threat. The start-stop system always works not only when the engine is operating at a higher temperature.

    This problem can occur when the outside temperature of the vehicle is just too low for the fan system to work on. If the battery needs too much power to supply the fan of the vehicle, it may cause the start-stop function to stop working.

    In this case, if you are driving in your vehicle and it happens that the vehicle comes to a complete stop as the case may be. The stop-start technology may turn off the engine of the vehicle because it needed more of an auto start-stop system.

    Under the normal condition of driving the vehicle, when you take your foot out of the braking system of the vehicle, the engine will start automatically. In that case, you are good to go with the warning light.

    Conclusion:-

    We hope the above-mentioned information about the service stop/start system warning light will be helpful to all the readers. If anybody’s doubts persist feel free to comment in the comment section below. We’ll definitely try to solve your doubts as soon as possible.

    What Is The Power Button On The Rear View Mirror?

    Have you ever wondered what is the power button on the rear view mirror of your car? Auto mirrors provide essential visibility to the rear and sides of a vehicle. However, they can also be sources of discomfort – being blinded by the glare of headlights behind you through your rearview mirror which reduces your safety on the road. Thankfully, it’s simple to adjust the mirror by using the switch at the bottom of the rearview mirror. 

    What Is The Power Button On The Rear View Mirror?

    A switch or tab at the bottom if you have a manual rearview mirror. It should move up and down. Changing the switch’s position changes the way the mirror works. Flip it one way and you’re in daytime driving mode, with everything crisp and clear. Flip it the other way, and it changes to nighttime driving mode. The reflection is dimmer, but it is meant for nighttime driving and dims the glare from headlights behind you.

    How Does The Power Button Switch Work?

    If you’re wondering what is the power button on the rear view mirror of your car and how does it works? Your rearview mirror glass isn’t flat it’s a wedge of glass that’s thicker on one end than the other. When you flip the switch at the bottom of the rearview mirror, the wedge moves. What this does is change the way light passes through it and how it’s reflected.

    In daytime driving mode, the back surface of the mirror is what reflects light and images. When you flip the switch and change the orientation of the mirror glass, the front section is responsible for what you see. Because the light and images must first travel through the backside of the glass before hitting the front and bouncing back to you, the image is dimmer and the glare of headlights behind you is greatly reduced.

    How To Turn On And Off The Auto-Dimming Button?

    When driving after dark, the automatic dimming function reduces glare in the rearview mirror from headlights behind you. Press the AUTO button to turn this function on and off. This function cancels when the shift lever is in Reverse (R).

    Advantages Of Auto-Dimming Rearview Mirrors?

    As we previously mentioned, the mirrors dim automatically, reducing glare and discomfort. What’s more, they dim proportionately to the amount of light that reaches them, allowing the mirror to dim more when headlights are brighter or closer to your vehicle. The advantages of these mirrors include:

    1. Auto-dimming technology guarantees the right amount of dimming at any given time

    2. Eliminates the need to manually adjust the mirror when driving at night

    3. More transparent view than conventional rearview mirror technology

    Disadvantages Of Auto-Dimming Rearview Mirrors?

    Any electronic object can malfunction, which may occur at inopportune moments, if at all. In addition, auto-dimming rearview mirrors are more difficult to repair than conventional rearview mirrors. Electronic rearview mirrors also take time to get used to, since you will probably attempt to manually adjust them at first out of habit.

    If you’re wondering what is the power button on the rear view mirror of your car and what are its advantages, and disadvantages of it? 

    How Do I Adjust My Rearview Mirror For Night Driving?

    Flip your rearview mirror by flipping the small lever at the bottom of your rearview mirror switches the mirror to its night setting. Headlights behind you will still appear in your mirror, but dimmer and less distracting.

    Conclusion:-

    If you’re wondering what is the power button on the rear view mirror of your car? We hope the above-mentioned information will be helpful to all the readers. If anybody’s doubts persist feel free to comment in the comment section below. We’ll try to solve your doubts as soon as possible.